When you share your documents and they leave the safety of your corporate network, you want to be sure you don’t accidentally share confidential information hidden in their metadata.
Thankfully, it’s fast and easy to make sure your Word documents and PDFs are secure. This illustrated tutorial shows you how to clean metadata from email attachments.
Just to let you know, you can use these same steps to clean PowerPoint presentations and Excel spreadsheets.
A quick note – If you don’t have Workshare Protect (part of Workshare Secure) installed, you can get the trial version set up in less than five minutes.
Remove metadata from email attachments in 5 steps
Step 1: Add your files to your email
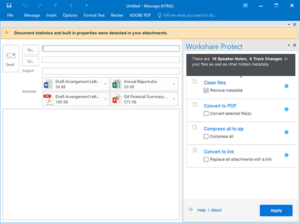
When you add email attachments to a new email, the Interactive Protect panel opens automatically.
This panel provides options to help you secure your files. We’ll cover these options in the next steps.

Step 2: Choose which metadata to remove
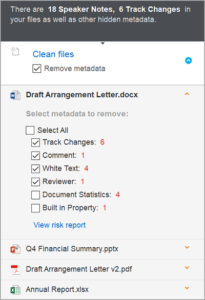
The Clean files area is where you remove metadata.
By default, all metadata will be removed from all of your files.
If you’re working quickly and just want to know that your documents will be secure, leave the Remove metadata checkbox selected and skip to step 4.

Not all metadata is sensitive or confidential, and Workshare enables you to decide if you want to leave some kinds of metadata in your files.
If you want to choose exactly which metadata is removed from which files, follow these steps:
- Click the Clean files areato expand it. You’ll see a list of the files attached to your email.
- Click a file name to expand it. You’ll see a list of the metadata contained in that file.
- Tick all the boxes for the metadata you’d like to remove.

Tip! If you want to find out more about the metadata in an attachment, click View risk report.
Step 3: Select any other security options
The Interactive Protect panel offers you other ways to secure your files. You can choose any or all of these options.
Option 1: Convert to PDF
Workshare enables you to convert files to PDF (assuming they’re not PDFs already).
A file that’s been converted to PDF is more secure because it’s harder to edit. Adobe provides more reasons to convert to PDF, which you can read about in their blog.
To convert all your attachments, select Convert selected file(s).
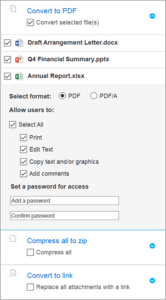
To convert only some attachments, click the Convert to PDF area to expand it, then select which files to convert.

With Convert to PDF expanded, you can also:
- Specify whether the file should be converted to the archive format of PDF (known as PDF/A).
- Determine what can be done with your PDF (like whether users can print it).
- Set a password that will then be required to view the PDF.
Option 2: Compress to zip
When you zip files, you’re making them smaller and putting them into a single folder (which has a .ZIP extension). A reduced size is useful because it means large files take up less space in your inbox.
But did you know you can enhance security by setting a password for your ZIP folder?
First, select the Compress all checkbox.
Next, click the Compress all to zip area to expand it. With the option expanded, you can set a password.
Option 3: Convert to link
This option saves your documents to a folder in Workshare Connect.
Folders in Workshare Connect are accessible online, from anywhere.
They provide these additional security benefits:
- You can manage folder members and folder permissions at any time, so you can revoke access if you need to.
- You have an audit trail of who’s logged in to access the folder as well as which files they’ve downloaded.
- Privacy is ensured by end-to-end HTTPS transfer and 256-bit AES encryption.
To use this option, select Replace all attachments with a link. When you apply the option (see step 4), a link to the Workshare folder is added to the body of your email so your email recipients know where to go.
Step 4: Apply your options (and, in the meantime, write your email)
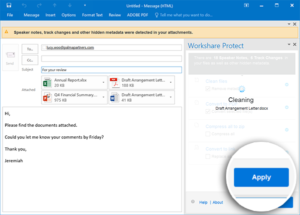
All set? Click Apply.
In most cases, your options will be applied in seconds. But if you have large files that are taking a bit longer, that’s ok – you can keep working while they’re processing.
Go ahead and write your email, add a subject and choose email recipients.

If you want to preview your documents to see what your email recipients will see, just double-click the attachments.
Everything’s ready! You can send your email.
Remove metadata from files on your computer
You don’t have to be emailing a document to clean it. You can clean files that are on your computer.
If you have Word open:
- Select the Workshare tab and click Content Risk. The Document Risk Report opens, showing you which metadata is in your document.
- Click Remove. The Advanced Optionsdialog opens.
- Select all the metadata you’d like to remove.
- Click OK.
If your documents are on your computer:
- Right-click one or more documents (or even a folder full of documents).
- Select Send to > Workshare Batch Clean. The Batch Clean dialog opens.
- Select all the metadata you’d like to remove.
- Click Clean.
Find out more
Check out the Workshare Professional 10 User Guide for anything and everything related to removing metadata from Word documents and PDF files.
Removing metadata is a great first step in protecting your files, but if you want to take email attachment security to the next level, you need to control who can receive your email attachments – and block anyone who shouldn’t. Read all about it here: Recipient checking specifically for law firms
A word to the wise, remove metadata from your Word documents
It’s really easy to forget to remove hidden metadata from documents, but man, can it be embarrassing. And that’s the best-case scenario.
Check out this example published in The Guardian, UK, where the sender forgot to remove the track changes in a Word document they submitted to the newspaper.
Most people go about their business every day in blissful ignorance of the fact that the Word documents they’re working on are also working away in the background creating hidden metadata. This metadata might include document properties, redacted or deleted text, or notes made during a review cycle – as in the aforementioned example.
All this metadata can be completely confidential and shared completely inadvertently with other people.
The problem isn’t that metadata is added to a Word document, it can be useful for indexing and document management. The problem is that metadata can be difficult to fully identify and remove manually from a Word document you’re sharing.
For example, adding comments and using track changes is helpful when you’re working on a file, but if a change isn’t accepted, it remains in the document, even though you may no longer be able to see it.
The cost of not removing metadata from Word
It’s best practice to remove metadata from Word documents before they’re shared, but doing this manually is completely impractical. When you need to work on documents with people outside your organization, or to send information to others by sharing attachments, removing metadata from Word documents is probably the last thing on your mind – even if the content is sensitive. You might be under time-pressure, you might just be sending a quick email, but not removing the metadata from Word documents before you share them could come back and bite you – and that sucks.
Seriously though, omitting to remove metadata from Word documents could expose you, your colleagues or your company to serious risk. As a minimum, if critical metadata leaks it could lead to loss of confidence, clients or to disciplinary action. At worst, it could create serious reputational damage and even legal suits, especially if personally identifiable information is involved. With the advent of the GDPR, the fines associated with this kind of data leak could have disastrous consequences for firms.
The simple way to remove metadata from Word documents? Let automation take care of it!
So, what’s the best way to ensure the Word documents you share outside your organisation don’t carry sensitive or confidential metadata?
Firstly, you need to be mindful that metadata almost certainly exists in every Word document you’re sending. Just because you can’t see it doesn’t mean it’s not there. Once you’re cognizant of that fact you can move on with removal.
Secondly, you need to be aware of all the methods you use to share Word documents. Not just your desktop email client, but your mobile device and any file sharing methods you use to share outside of the office. They must be sanctioned by IT and fall under your firm’s compliance policy, otherwise, it’s just cheating.
If you follow the steps above then you can get a relatively inexpensive, but comprehensive metadata cleaning tool that protects the files you share – and you’re covered.
An automated solution will apply your company’s security policies, spot sensitive content and then remove metadata from Word documents. The solution should also be integrated with Outlook and your Exchange email Server to apply protection across your desktop, mobile or online sharing platforms. All this takes place without the need for any manual intervention, which basically means you can’t forget to remove the metadata from your Word documents, because the system will do it for you, without slowing you down.
What’s next?
Give Workshare a call if you’d like to talk more about this – we love a good metadata removal chat!


